
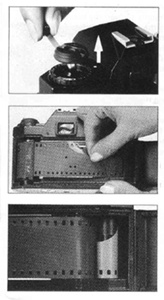
* 1. LOADING FILM
- To open the back cover, I fold out the film rewind crank then I pull it out.
- I insert the film into film chamber that the projecting end of the film is downward.
- Then I lift the film rewind crank and I turn it while the film locks onto the film rewind shaft.
- After that I insert the film leader in the take-up-spool and place it in one of the lower row.
- I roll the film on the take up spool.
- Finally I operate the film advance lever to advance the film till the film aligns with film guide rail.
- The frame counter is automatically resets after i loaded the film.
To ensure that I will have a correct exposure first, I should know the Sunny 16 Rule and second I should apply bracketing. These two thing will help me to get the exposure right.
- Sunny 16 Rule:
This rule helps me to estimating the daylight exposures without using a light meter. So I should manually set the aperture on F16, if I'm taking a photo in daylight/full sun. To setting the aperture is all about how much light falls on the subject. Therefore I don't always use F16, because if it's half sun I should set the aperture for F11, F8 is for open shade, F5.6 for darker shade/indoors (sunny day) and F4 for the darkest shade/indoors (dull day). The different weather makes different shadows. In full sun we've got very strong and sharp shadows in half sun we've got soft shadows. To improve the exposure I also have to change my shutter speed to approximately the same as the film speed.
- Bracketing:
The bracketing is about taking 3 images of the same subject with different settings. So, in every 1 shot I change the aperture and shutter speed. By doing bracketing, it helps me to get a minimum 1 well exposed image out of 3 because with SLR camera we can check the picture after took.
Ex:.

F16 F11 F8
When we took our pictures in college the weather was poorly raining and very cloudy so we started off with aperture F8 and 1/500 th shutter speed. The bracketing was F11 F8 F 5.6.
For me, I had to use different settings then others because I haven't got time value index on my camera, therefore I started off with aperture F3.5 and I left it there because I only had to change the film speed in every 1 one shoot out of 3. So my bracketing was turning the film speed - ISO 400 - to +1 0 -1.
Film ISO is 400 and it has 36 frame.
* 3. PROCESS BLACK AND WHITE FILM
- Materials: Exposed Black & White Film, Can opener, Scissors, Tank, Post, Spools, Funnel, Lid,
Thermometer, Measuring jugs, Chemicals (Dev (ID-11), Stop, Fix, Timer
To process film I should be in complete darkness therefore I can't even use the safety light. Before I did my real process, I have been practicing how to load the film into the tank in daylight and in complete darkness. I set out the film and equipments in a logical order so I was able to find them in the dark.I had to be very careful when I get the film into the spool/spiral because the different parts of the film should be away from one another. The spool has grooves to hold the film away from one another so the chemicals can circulate freely, but if you load the film incorrectly the pictures will spoil. After practice, I was ready to do the real process with my Black & White Film.

1. Lid 2. Post 3. Tank 4. Spool 5. Funnel
- In the processing room:
1. I set out the film and equipment in order
From the left: Tank with the post in it > spools > funnel > lid
In front of me, I had my film > can opener > scissors
2. I switched of the light
- Opened the film canister
- I cut off the leader of the neg into a nice square end
- I found the projecting lugs (entry point) on the spool
- I rotated the sides of the reel back and then I wind the film into the spool correctly
- After I reached the end of the film I cut off the end.
- I winded up the left bit of the negative
- I put the spool into the tank, the post gone through the middle of the spool
- I put the funnel on and turned it till I heard a click so I knew that its light tight
- I put the lid on
- I turned the lights on


3. I measured out the chemicals.
I was working with 2 other person so we had a tank with 3 spools.
Tank size 900ml
Dev: 225ml dev 675ml water 20min
Stop: 900ml stop 1min
Fix: 900ml fix 6min
Rinse: 20min
Water was at about 20 Celsius.
4. I mixed the chemicals
I measured out 225ml dev with a 700ml measuring jug then I poured it to a 1000ml measuring jug. After that, I washed out the dev from the 700ml jug then I measured out 675ml water with it and I poured it to 1000ml with the dev in it. So at the and I had exact 900ml mix of dev + water in the 1000ml measuring jug.
Developer:
I started to pour in the developer into the tank quickly as possible. Then I started the timer after I finished pouring. I put the lid on and I started to agitate the tank upside down for 10 seconds and I taped it on the desk to avoid any air bubbles. I agitated again at the start of every further minute (20 min). After the 20 minutes I started to pour out the developer out of the tank straight to the sink because I can't use the developer again. During the development I measured 900ml stop for the next part.
Stop bath:
After I washed out the remaining developer with water from the tank, I poured the stop bath into the tank. Agitated the tank upside down for 10 sec, I taped it on the table. After 1 minute I poured the stop bath back into the storage bottle.
Fixer:
I poured in the 900ml fixer what i measured out before then I started the clock then agitated. This part took 6 minutes. Then I poured the fixer back into the storage bottle
Water Rinse:
Nearly the last part of processing the film is water rinse. At this time my film is fixed so I just removed the lid and a placed the tank under a piece of rubber tube with running water (20 Celsius) , so the water gone down the center of the spiral to the bottom of the tank. I rinsed the film for 20 minutes.
Drying:
The final part is drying. After the 20 minutes rinse in water I took out the film,lifted up and unwind it slowly. I was so excited when I saw that my negatives come out well and I can see the bracketing and full range of tones. Then someone held me the film and I removed any excess water carefully with a piece of shammy leather. After that i put plastic film clips at the two end of the neg then i hang it in the negative dryer for 20 mins.
After I've got my dry negatives I cut them into 6 strips and I stored them in a negative bag.
No comments:
Post a Comment