Total Pageviews

Tuesday, October 23, 2012

My street photographs - Part 1

   Usually Street Photography happens in a busy city/public place. This type of photography is good to take natural pictures of human behavior and also people are the best subject to create interesting images. It isn't the easiest thing what I've done because the essence of street photography is that capture an image without people recognize you're taking picture of them and it's really hard because if they see a camera in your hand, their behavior start changing immediately. Try to avoid eye contact and invade someone privacy.
 
   On Saturday I went out to take some street photographs at Newton-Le-Willows Market. The weather was sunny and cloudy on Saturday, so I had to change the ISO and aperture all the time, if I was taking pictures in shadow or out on sun. Few times I forgot or I hadn't got time to change back the settings because the moments was happening, that's why some of my pictures are overexposed, but I still show you them because I've got good compositions and good shots in the right moment. I used my Canon EOS 1100D camera to take these pictures. As you can see every image is black and white. To take B&W images, I need to press: MENU > 2nd camera icon > Picture Style > Monochrome.


   At this time, my concept about photographing in the street was walking around the market, looking around everywhere and waiting for interesting actions or people. Also, I was thinking about to get some compositions on my pictures to make it more dynamic. Using different camera angles for example.

Here is a few picture of my street photos.

  With my first picture I show you the technique what I learned to edit an image with Camera Raw (Adobe Bridge) and with Photoshop.

Editing with Camera Raw


1. I need to decide that Do I have to crop the image or not?

   This picture shows you how to crop an image using Camera raw. By cropping, you can remove the unwanted parts of the image, but be careful if you're cropping because that affects the image quality (ex. more noisy).


2. I need to work with the exposure, recovery, fill light, blacks, brightness, contrast to create balance.

   My picture is really flat. Flat means, it doesn't bring out the depth and details. So,  I pumped the contrast to + 100. Contrast in photography is the difference between dark and light.


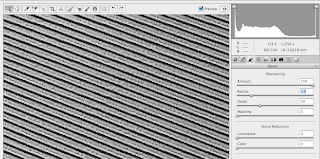
3. I need to sharpening.

  To show you what happening when you sharping an image, I zoomed in very close to see what happens because otherwise you can't really see the difference between the original and the sharped image.

1st image is without sharpening. 2nd image is with 150 amount of sharpening.
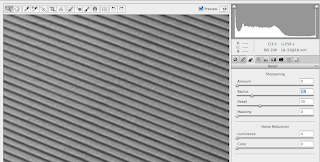


Sharpened image.


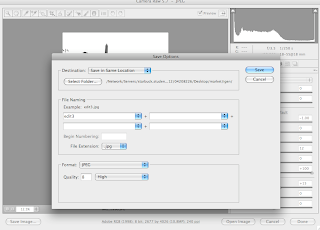
4. Save the image.

   Select a folder where you want to save the image, then rename your edited image and chose a file extension. Finally, press 'Save'.


   Next, I open the Photoshop to make further editing like burning and dodging. (Don't get confused, you can only use Photoshop to do the cropping and level balancing.) I just had to use and learn both editor in college.

Editing with Photoshop ( Burn Tool & Dodge Tool )

1. Burn Tool

   Find the burn tool icon (hand icon on the left side), then at the top change the brush size, the range - is the tones you want  the tools to effect - to highlights/midtones/shadows and the exposure - how intense you want it's effect to be - . The burn tool make things darker. To burn in sky set the range to highlights. After that, I burnt in the bright white sky because that was a bit distracting and also because I want that people focus on my primary subject (gentleman) instead of the sky. Usually people eyes look the brighter things first. Also, I burnt in the shadows by setting the range to shadows.
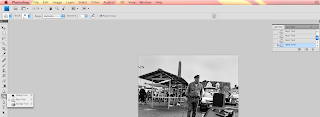


2. Dodge Tool

   Pick the dodge tool icon (like a black lollipop icon) and change the things at the top again. Now, the dodge tool makes things lighter. I wanted to dodge the gentleman's face and clothes to get more detail, so I set the range to midtones. I created the desired look I wanted, so finally 'how to save it?'.


3. Save the image

Go to File > Save as > Select Folder > Rename > Save


Compare the images and see the difference.


Wednesday, October 17, 2012

Street Photography

Hi bloggers!

   This week  we have been looking at street photographers such as Henri Cartier-Bresson, Joel Meyerowitz, Alexandro Rodchenko. These photographers have all used 35mm film to capture natural images. They were waiting for the moment on a busy street or they were looking for compositions: natural framing, geometry, Juxta position,  ambiguity, balance of contrast, reflection, repetition or strange camera angles, etc. I think the most important thing in street photography is to capture image which is narrative, which draws your eyes all around the image and you start to think or make a story in your mind about what's happening on the picture.


Joel Meyerowitz

   Joel Meyerowitz was choosing busy streets in New York to capture moments. He was waiting for the moment and looking all around the street and shot when he saw a good composition etc. His camera was already setting to the right functions so he could take a picture really fast to capture the moments. He was using wide lens to get more things on his images. I chose this image because the title of the movie "kiss me stupid" is just happening in real time, as you can see the kissing couple. The main subjects (couple) positioned in the center, exactly under the title. Some part of the image is blurred that's because the movement of people. Also, there is a repetition of the light on the top which are leading your eyes and you're focusing at the center. Quite narrative image,lot going on. I like the opposite color between the couple dressing. 


Henri Cartier-Bresson's photographs


I chose this image because it's shallow depth of field, the background is blurred and the two boys are in focus. I like the range of tones and the balance between the trousers,shirts,boys' skin color and the hats. There is a bit reflection in the mirror too. 


   Cartier-Bresson most of the time was capturing moments or waiting for moments, but this time he took an image where the kids are in a spiral position. You can see the repetition of faces and lines at the middle, also he chose a strange camera angle (90 degree) to get most out of the picture pointing upward. The spiral stairs is leading the viewer eyes. You can see the range of contrast. It`s got white, grey and black tones. Also it`s got the rule of thirds. If I split the image into thirds you can see different thing in one zone. Some of the zones are the negative space of the image. Wide depth of field is going on this image, so he used a quite small aperture to get everything in focus.


Tuesday, October 16, 2012

Depth of Field

                                                  Depth of Field

    is the distance between near and far objects which appear in or out of focus depends on what camera settings you choose, so actually it means how much of the photograph is in focus. The 3 main things to control depth of field are aperture, distance and focal length.


- Aperture: Easiest way to manipulate the depth of field by adjusting aperture. Low F-stops give short DoF, High F-stops give long DoF.


- Distance between camera and subject: To increase depth of field, move back; to reduce it, move closer.


- Focal length: At a given distance, at a given aperture, the longer the focal length of the lens (200), the shallower the depth of field is and the smaller the focal length of the lens (35mm) ,the wider the DoF is. 


Shallow depth of field:
   
   is when only a part of your image is in focus while the other are blurred. There is a word use in photography "BOKEH" which means the blur of an image. It can be pleasant (smooth Bokeh) or unpleasant (rough Bokeh) to the eye. So if you want to blur the distracting background for example on a portrait image or close ups object. All attention of the viewer is on the subject. To get a nice shallow depth of field you need to set your camera aperture to a small F-stop, like F1.8 - F3 and increase the shutter speed to 1/125th of a sec as an example, because if you don't use a fast shutter speed your image will be over exposed.


Wide depth of field:
    is when the hole image is in focus and very sharp. Usually used for landscape images. To get a nice wide depth of field you need your aperture should be very small F22/F16 and the shutter speed should be very slow around 1/30th of a sec as an example to let in enough light and get a correct exposure. You should use a tripod to avoid camera shake at slow shutter speed which can cause unwanted blur on the image.


* Meter Modes

   The metering mode is used to measure the brightness of the shot you want to snap (where you pointing the camera). Here is a few metering modes what you can find in your camera menu.

Spot Metering
Partial metering
Center-Weighted Metering
Evaluative metering

I will explain these modes later on if I get use to it.  


Monday, October 15, 2012

Positive Print

                                   Process Negative Film into Positive Print

* Materials:

- Enlarger
- Easel
- Grain Finder
- Photographic paper
- My negatives
- Tea towel


* Settings:

    Before I went in to the dark room, I had to chose 2 negatives what I like the most and outline the theme of perspective. I chose one of my library one and one of my people with umbrella. Once I selected my negatives I had to set my easel for 9 cm height and 6 cm width (9x6). This size is good for get a nice resolution image and nice border. After I set my easel I sticked on a piece of masking tape because the holder was loose. Next, I had to set my enlarger.

* Getting ready to process:

   This time I learned more about how to use enlarger. First, I placed the easel under the enlarger and I set the size of the light by turn the dial at the back of the enlarger to move it up and down. The right place of the light should be on the border of the easel. After that, I pressed the focus button on the timer and I set the aperture to F11. I left the light on and I pulled a handle up so I could slide out negative carrier. Then I went out from the dark room to place the negative into the negative carrier. I turned the negative upside down and when I put the negative carrier back into the enlarger my negative should be shiny side up. Pulled the handle down to fix the neg carrier and once I saw the image on the base board, I could adjust it into the right place. Then I visually focused the sharpness of the image, I took a grain finder and I tried to place it on a light place to find the grain. Once I found the grain and the focus dial on the side of the enlarger. I tried to focus on precisely but if my grain was blurred that means my actual image is blurred and out of focus. Switched the light off.


(1. First,I chose one of my neg with a taxi on but after I did my test strips and a big print I didn't waste more time on it because the taxi was out of focus and I think I chose wrong time value because it got overexposed, it's too dark. The camera was focusing on the buildings behind, so I get frustrated and I changed my neg to an other one. )


* Test strip and big print

2. Picture:

   After I changed my neg to a library one and I started again everything what I did with the Taxi. The settings were the same.So, I focused on, I got a piece of photo paper and I ripped it into 4 test strips. Then I placed one in the easel in diagonal line. First I set the timer to 3 seconds then I pressed the run button and exposed the hole piece for 3 secs. Then I held the photo paper box above the easel and I pressed the run button again and again while i was pulling away the paper box a little bit about 8 times. Then I processed the image in the usual way, showed the test trip to the teacher but it's gone black, so I went back,looked the aperture and because I forgot to change back the aperture after finding the grain, it was on F2.8 so I changed the aperture to F8 the magenta to 60 and I did an other test strip. I showed again to teacher and he suggested that to do a hole test strip with 11 sec. I didn't really get a good test strip because I was doing it quickly so it's got finger print and lighter tones because I took it earlier from the dev. Not a good thing to do because maybe then I will get a different tones on the big print. Before I did the test strip again I changed the to a thicker one which you can see on the test strip is more sharper then the one before.


   So after I had my test strip and it looked good, I did the big print, exposed it for 11 sec, processed it carefully and finally I've got a really good print of the library. Sharp enough, dark enough and the ceiling has a better exposed then on the test strip so it was a good idea to change my neg into a thicker one.


3. Picture:

   On my last one, I chose couple walking towards me and the college behind them,so I've got a good perspective, the building and people on my picture. I'd got everything done so quickly at third time. I did the test strip, I chose 9 sec to do my next text strip. Aperture was on F8, magenta on 60. I went back to the dark room, exposed my hole test strip for 9sec, processed it and I've looked it in light,the time value was right, so I started to do the big print.


   Exposed it, processed it properly and dried it. The problem with this picture is that the two people are overexposed while the building is well exposed so if exposed the hole print for less time I will lose the building. There is a way to doing it by changing the filter, but I couldn't do it this time. But overall, I'm happy with this image,it's enough sharp if I look the nine-grid zone I've got different things in every zone.